
Whether you want to bake for Halloween, or you just want to impress everyone at a gathering, this easy pumpkin pie made from scratch will do the trick. It’s freezable, and I will show you how to easily make this recipe gluten free.
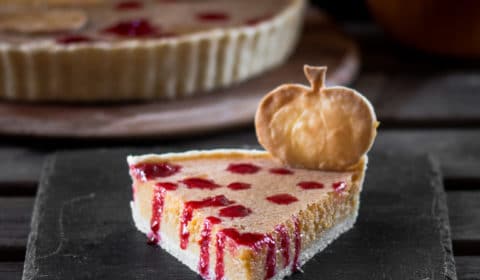
I cannot believe that this pumpkin pie recipe from scratch worked out perfectly for me on my first attempt of making it! And I when I say perfectly, I really mean it. The pastry was cooked beautifully and the filling was set, and it was smooth with 0 cracks on top.
So let’s get into how to achieve that!
The Pastry/Crust
So we’re going to blind bake the pastry, meaning we are going to bake it without the filling first for a certain amount of time. This will prevent the pastry from ending up soggy or undercooked.
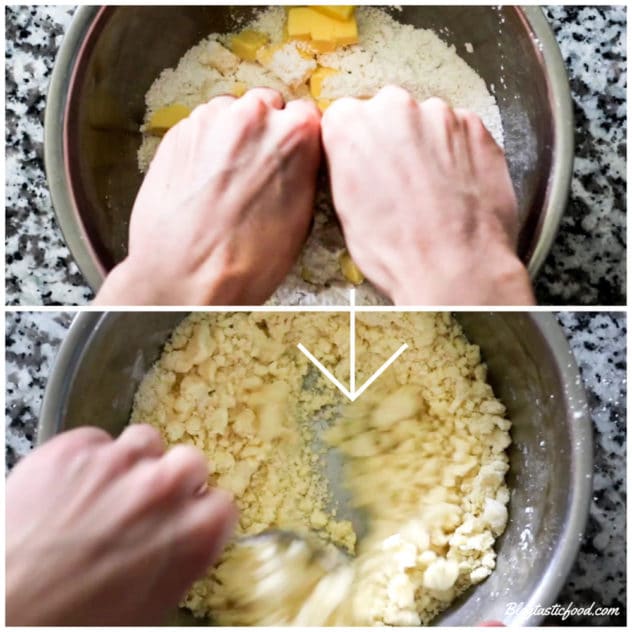
So first, we pinch the butter and flour together in a bowl until you get a breadcrumb looking consistency.
From there we add our sugar, COLD water. It’s important that the water is cold when you add it because that ensures the butter will not melt.

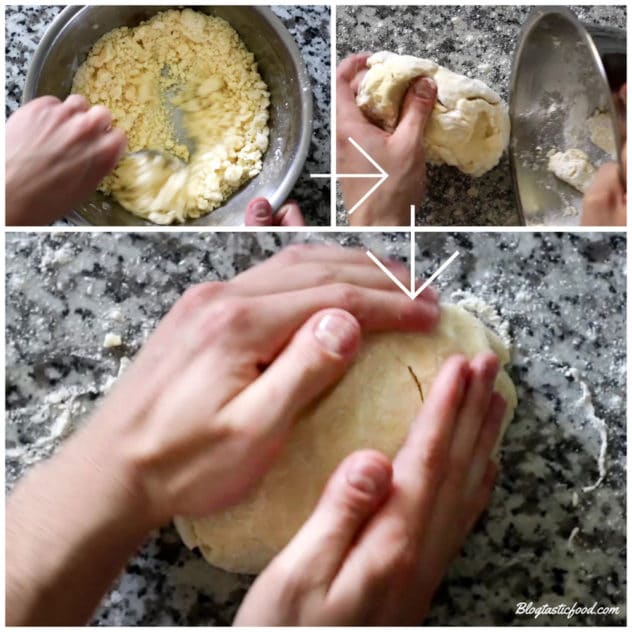
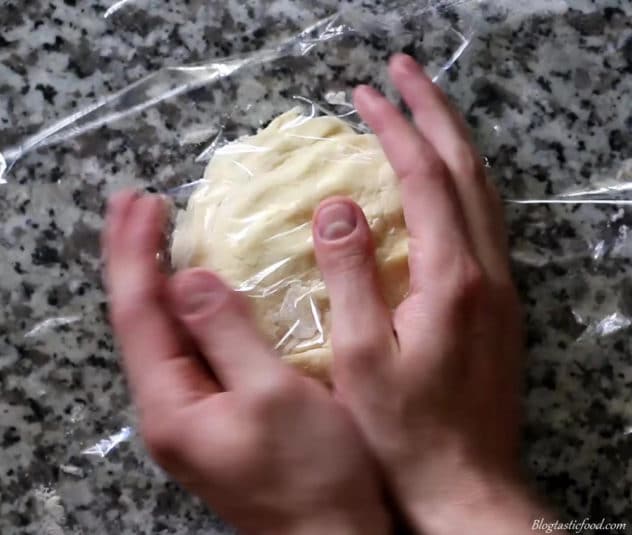
Start mixing the water and sugar through the buttery flour, once it starts to come together, pour it out onto a flat surface. From there, it’s important that you do NOT knead the pastry. Instead, just firmly push it all together until well combined.
Wrap the pastry in cling film, put it in the fridge and let it rest for 20 minutes.
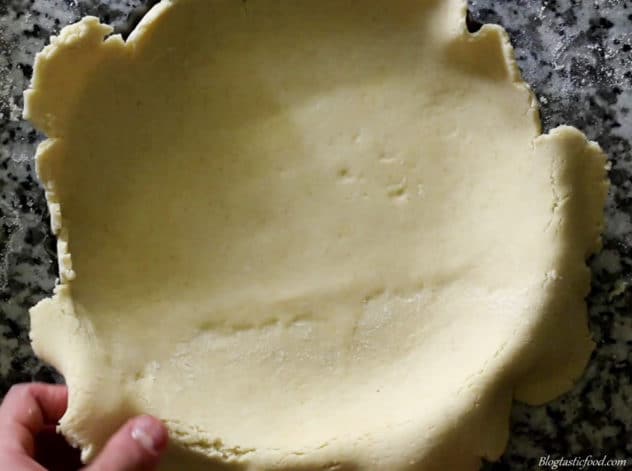
Now, once the pastry has rested, take it out of the fridge, unwrap it and put it back on your surface. At this point, you want a rolling pin and plenty of flour for dusting. Lightly dust your surface and your rolling pin to make sure the pastry doesn’t stick.
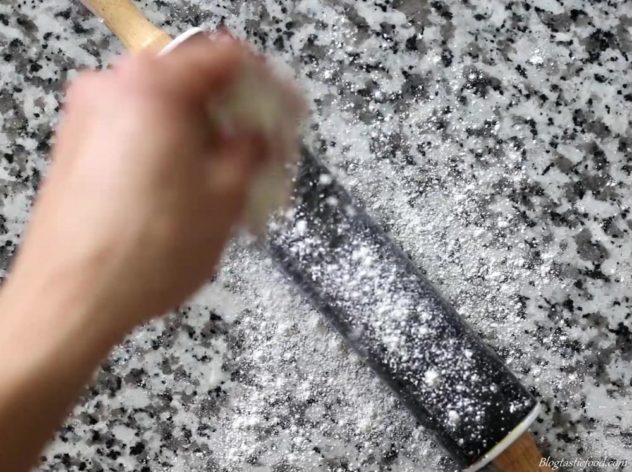
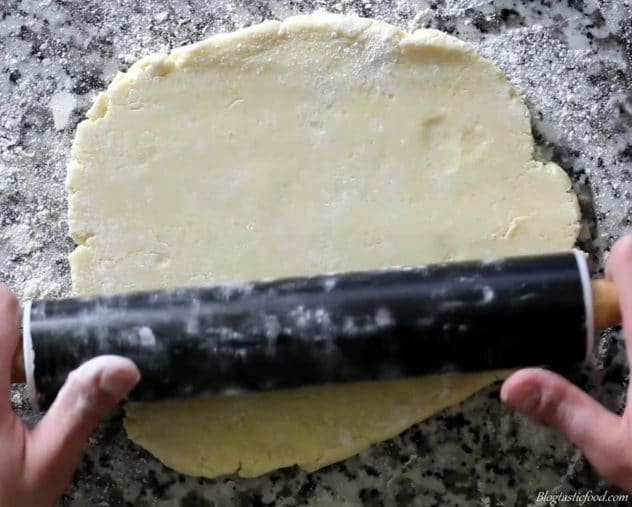
And then we just roll out the pastry 5mm thick. Keep lightly dusting the surface and the rolling pin whenever you need to, but remember, I said lightly dust. If you add too much flour, the pastry will start going dry and crumbly.
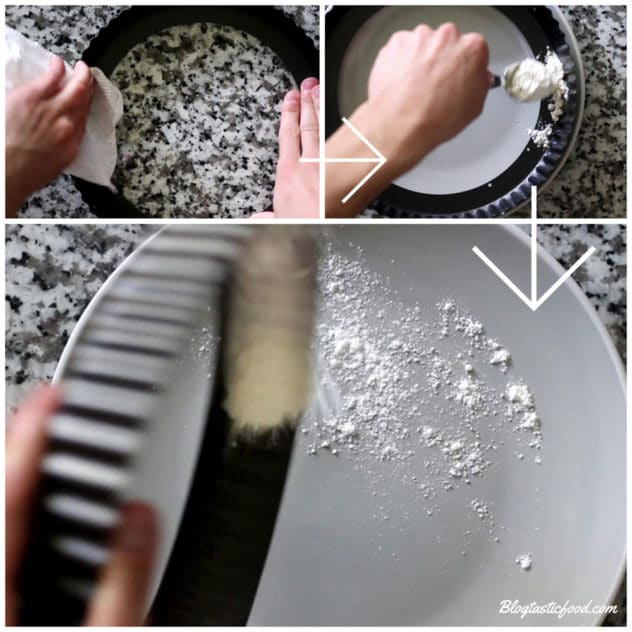
Grease a tart case with butter and flour. Make sure you dust off the excess flour so that you end up with a nice, light dusting.
Now, the best way to lift the pastry without breaking it is by rolling it up on a rolling pin.
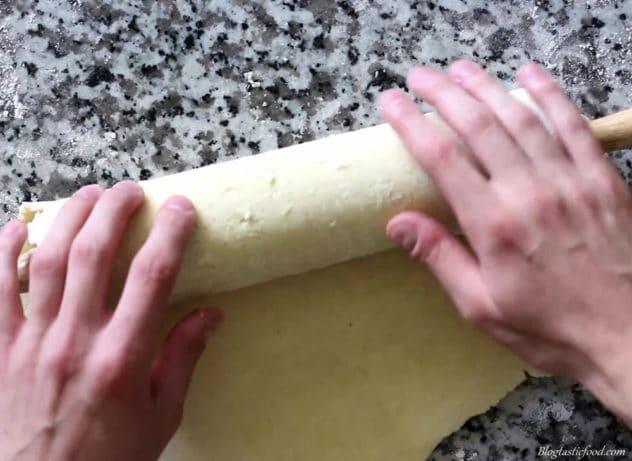
Then, gently unroll and lay it over the greased and floured pastry case.

Make sure you gently tuck the pastry in the bottom edges and then use the rolling pin to roll off the excess pastry draping over the edge.
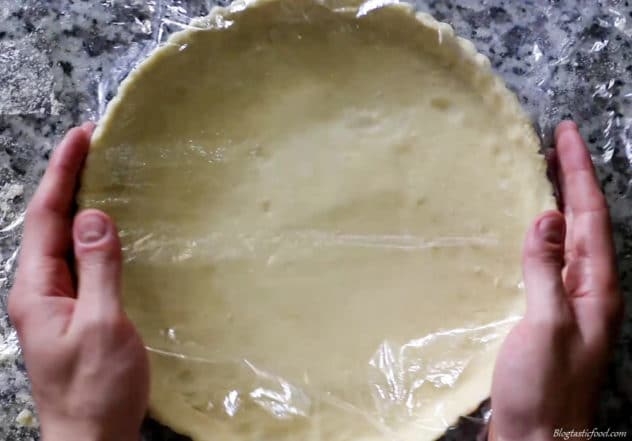
At this point, wrap the pastry in cling film again, rest it in the fridge for another 20 minutes, then pre-heat your oven to 180 degrees C (350 degrees F).
Take the cling film off the pastry, prick a few holes in the bottom of the pastry, scrunch up a sheet of baking paper, dip it in water and then squeeze out the excess water, open it up and then lay it over the pastry case. Then, get some baking beans or some raw rice, and then put them over the wet baking paper in the pastry case.
The reason we weigh the pastry down with baking beans or raw rice is because it stops the base of the pastry from rising too much.
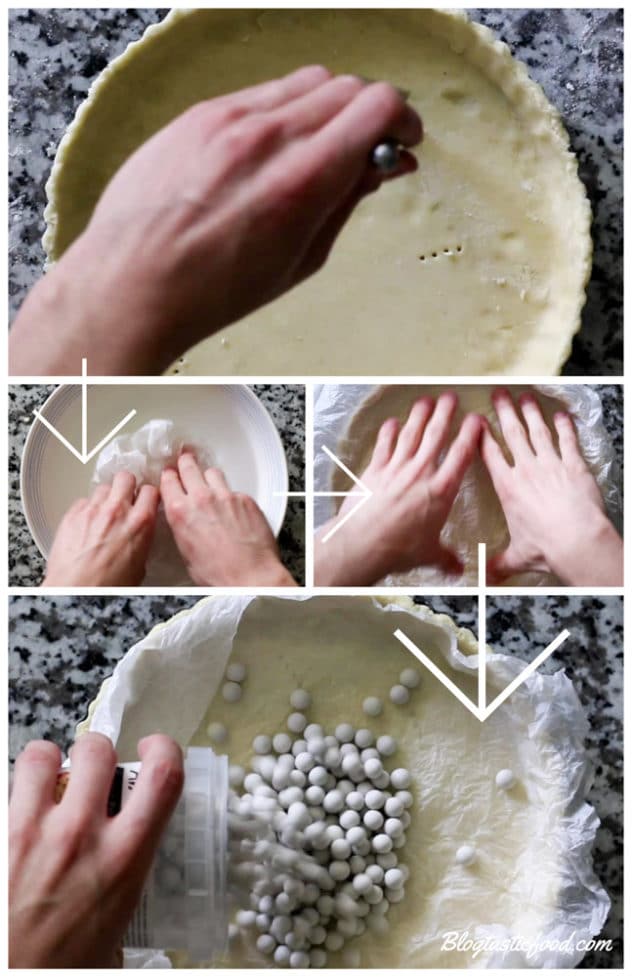
Finally, bake the pastry blind in the oven for 10 minutes, then remove the paper and the baking beans and cook the pastry for another 2-3 minutes.

Once you have made this sweet pastry once, you’ll be able to do it over and over again. And it will be super straight forward. You can also make this pastry in advance if you wish.
Making the Pastry Gluten Free
I’ve got fantastic news for all of you gluten free friends out there, the only thing you have to do in order to make this a gluten free recipe, is by using gluten free plain flour instead of regular plain flour. HOWEVER, the measurements are a little bit different.
When I added the water and mixed it through, the pastry just went sticky and sloppy, and I think it’s because the gluten free flour isn’t as dense as the regular wheat flour. All you have to do is add 75 extra grams of gluten free flour. So use 325g instead of 250g.
The Perfect Filling
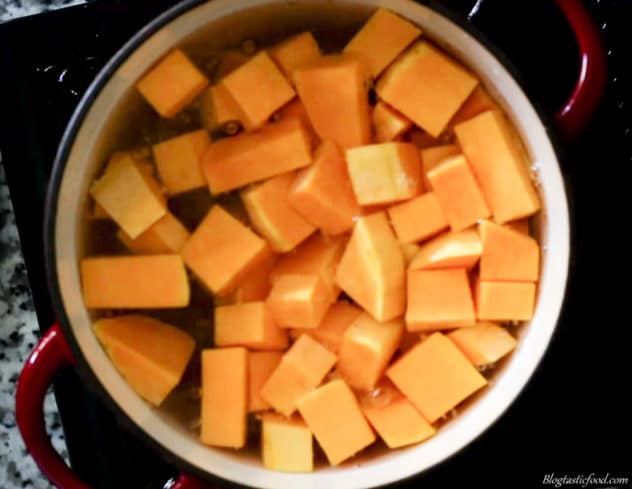
Making the filling is very easy, we simply boil the pumpkin until it is nice and tender (do not overcook the pumpkin).
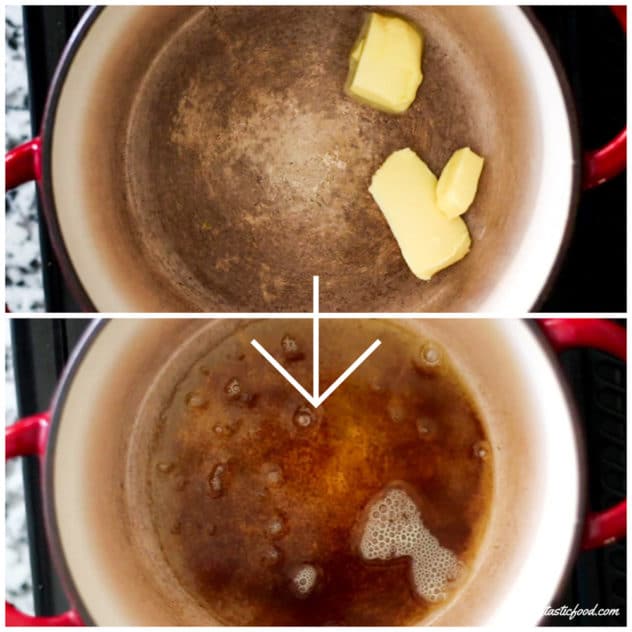
Then we heat the butter in a pot or pan until it browns (be careful not to burn the butter).
Now that you have all of your ingredients ready, you can put the cooked pumpkin, browned butter, sweetened condensed milk, spices, eggs etc. together in a food processor. Then process until you have a smooth mixture.
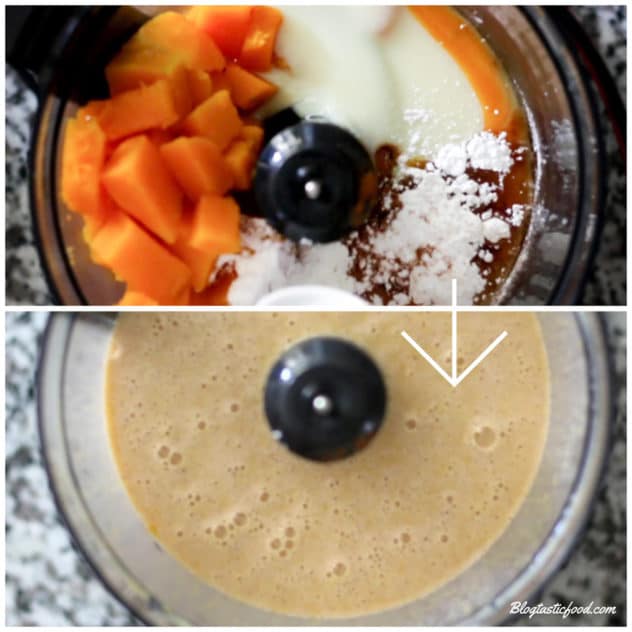
If you don’t have a food processor, simply mash the pumpkin with a fork, then whisk the ingredients together in a bowl until you have a smooth pumpkin mix.
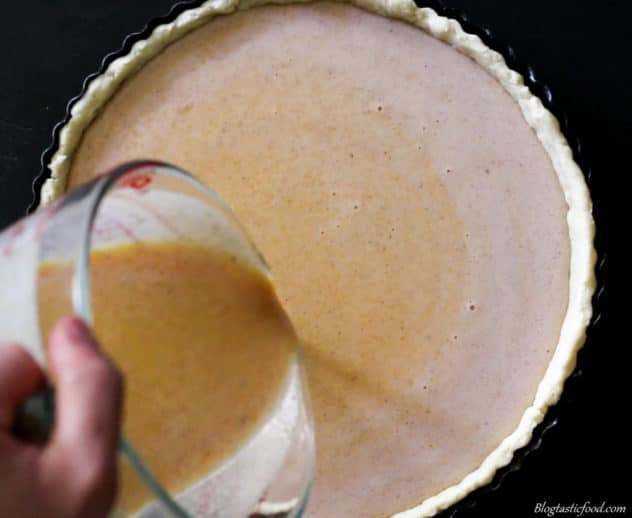
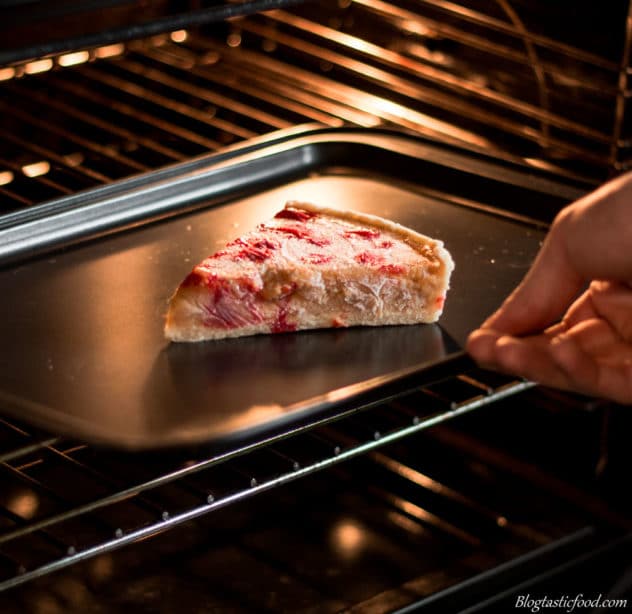
You then want to carefully add the pumpkin filling to the pastry case, making sure the pastry case doesn’t overflow. I always just like to place the raw tart on a baking tray, just in case there is any spillage.
Now, the simple key to achieving an amazing, smooth filling without any cracks is slow and low cooking. I cooked my pie at 150 degrees C (300 degrees F) for an hour. And let me tell you, it’s definitely worth the wait. Baking the pie at a really high temperature is what will dry out that filling, causing it to crack at the top.
How long does the pie keep?
I would keep pumpkin pie in the fridge for no longer than a few days, 4 at the most. If that is too little time for you to devour a pumpkin pie, then you can read about freezing it below.
Can you freeze pumpkin pie?
You can freeze the pumpkin pie if you want, always a good idea if you don’t want the pie to go off in the fridge, or if you want to make the pie in advance. Just keep in mind that when you defrost the pie, you should do it in an oven that’s hot, but not too hot (about 120 degrees C).
The heat from the oven will help dry out the outer ice on the pie, preventing it from going soggy.
Thank you so much for viewing this post, I really hope you enjoy this pumpkin pie recipe. If you would like to subscribe, feel free to do so. You’ll receive recipe post updates through your email, and you’ll receive a free E-book featuring 10 recipes.
You can also check out my Mini Halloween Pavlovas recipe.

Have an amazing day!!
Halloween Homemade Pumpkin Pie
Ingredients
Sweet Pastry
- 250 g of plain flour (or 325g of gluten free flour if you're gluten free) plus extra for dusting
- 125 g of butter plus a bit extra for greasing
- 80 ml 1/3 cup of cold water
- 2 tablespoons of sugar
- Baking beans or just a few good handfuls of uncooked rice.
Filling
- 530 g of peeled fresh pumpkin cut into inch thick dices
- 30 g of butter
- 2 large eggs
- 1 egg yolk
- ½ teaspoon of cinnamon
- ½ teaspoon of nutmeg
- 2 teaspoons of cornflour
- 14 oz 395g of sweetened condensed milk.
- A pinch of salt
Instructions
Pastry:
-
Put the flour and butter in a large bowl, then use your fingertips to pinch the cubes of butter in the flour. Keep doing this until the mixture resembles a breadcrumb consistency.
-
Next, add the sugar and the water, then use a wooden spoon or a spatula to stir the mixture until it starts binding.
-
Pour the rough dough out onto a flat surface, then use your hands to firmly push the pastry together until you get a nice smooth, sweet pastry.
-
Wrap the sweet pastry in cling film, then let it rest in the fridge for 20 minutes.
-
Lightly grease a tart tin with butter. Dust some flour over it so it sticks to the butter, Once you have coated the tart case with the flour, shake off the excess and set aside.
-
Take your pastry out of the fridge and unwrap it. Lightly dust a flat clean surface and a rolling pin with flour then roll your pastry until it's about 5mm thick. If the mixture starts sticking to the surface or the rolling pin, just add a touch more flour.
-
Gently lift the pastry by rolling it up on the rolling pin, then carefully unroll it over the tart tin. Carefully ease the pastry into the bottom edges. Use a fork to just lightly poke a few holes in the pastry. Chill in the fridge again for another 20 minutes. At this point, start pre-heating your oven at 180 degrees Celsius (350 degrees F).
-
Take your pastry out of the fridge. Get a sheet of baking paper, scrunch it up, soak it in water, squeeze out the excess water, open it up again then place it in your tart case over the pastry. Then fill with your baking beans or your uncooked rice to weigh the paper down.
-
Place in the oven and cook/blind bake for 10 minutes. Take the pastry out of the oven, remove the beans/rice and baking paper, then put the pastry back in the oven and cook for another 2-3 minutes.
Filling:
-
Turn the heat of the oven down to 150 degrees Celsius (300 degrees F).
-
Get a large pot of salted water and add your pumpkin. Bring the water to a boil. Once boiling, cook the pumpkin for a further 8-10 minutes until cooked through. Drain the pumpkin, then transfer on a plate lined kitchen paper to dry the pumpkin out.
-
Put your butter in a small pot or pan and melt on low heat. Once the butter starts bubbling, simmer it for another 5 minutes until it develops a brown colour (be careful not to burn it).
-
Put your cooked pumpkin, brown butter, eggs, your egg yolk, ground cinnamon, ground nutmeg, cornflour, condensed milk and a pinch of salt in a food processor, then blitz until you have a smooth mixture.
-
Alternatively (if you don't have a food processor), you could put the browned butter and cooked pumpkin in a large bowl and mash together with a fork until the pumpkin gets a nice puree consistency. Add your eggs, egg yolk, sweetened condensed milk, cinnamon, nutmeg, cornflour and a pinch of salt then whisk together until well combined.
-
Put the blind-baked tart case on a baking tray.
-
Transfer the filling to a measuring jug, then you can easily pour it in the pastry case.
-
Start pouring the pumpkin filling in the pastry case. Once the pastry case is almost filled up (meaning you may not need to add all the filling). Carefully place in the oven and cook for 1 hour.
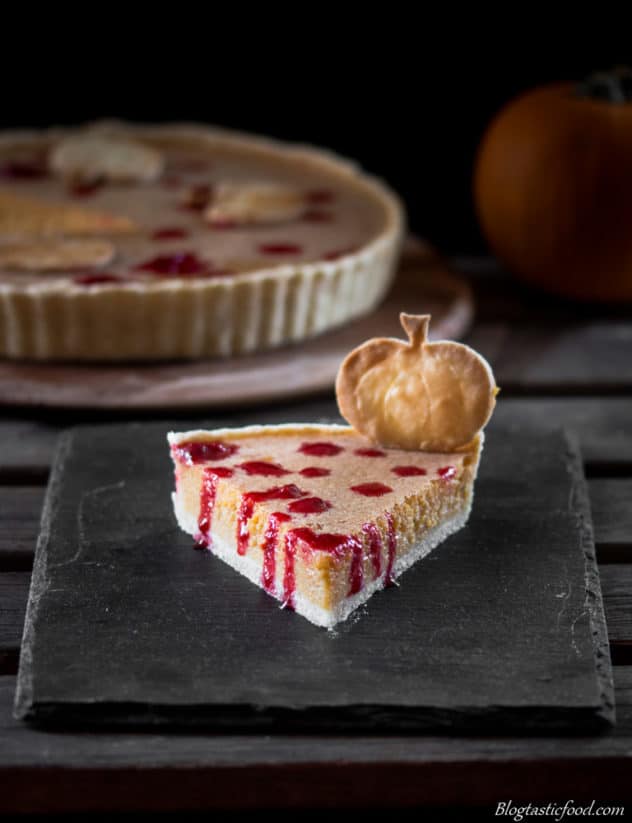
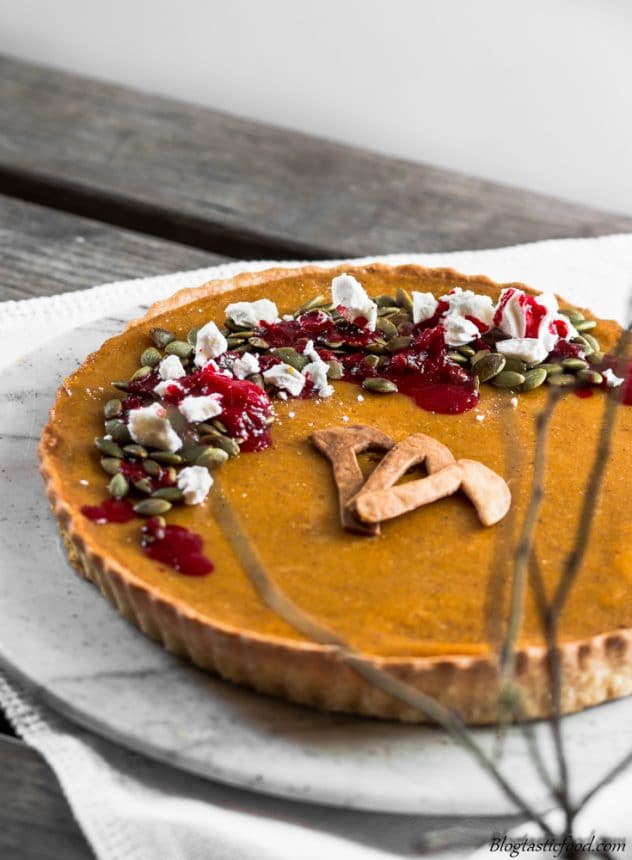
-
Once the pie is done, let it cool. Then you can top it with whatever you like. I topped it with some toasted pumpkin seeds, crushed store bought meringue and a strawberry coulis.
-
And now you are ready to serve your homemade pumpkin pie! Enjoy.
Recipe Notes
- Making the pastry in advance can make your life much easier.
- When you add the water to the butter and flour mixture, make sure it's nice and cold.
- Do not knead the pastry, just firmly push it together until it's a nice smooth pastry.
- When you dust your surface and your rolling pin, dust lightly. Too much flour will dry out the pastry.
- If you don't have baking beans to weigh down the pastry, use raw rice instead.
- If you use gluten free flour instead of regular flour, use 325g instead of 250g.
- If you don't have a food processor to process the ingredients for the filling, mash the brown butter and cooked pumpkin together with a fork until pureed, then add the other ingredients and whisk through.
- When you add the filling to the pastry case, make sure it doesn't overflow.
- Transfer the pie on a tray before placing in the oven in case there is any spillage.
- Bake the pie low and slow to get that nice, smooth pumpkin pie filling.
- You can keep the pie in the fridge for about 3-4 days.
- You can also freeze the pumpkin pie. Just make sure you defrost it in the oven.
Your pumpkin pie looks gorgeous! I have to admit I have not eaten it, most likely in 20 or so years! I did find it a bit strange but perhaps it is time to give it a go again 🙂
Haha yer I have only had it a few times before making it this time. When you make it well it tasted awesome. Thanks so much for your comments (:
Very impressive! I’ve made scores of pumpkin pies, but only went through the trouble of making the puree from scratch once or twice. I must say though, it does make a difference.
Thanks! Oh for sure. Once you have figured out the right measurements it works wonderfully (:
Beautiful. I’ve only made pumpkin pie from scratch once. It’s truly wonderful. But I also love the packaged pumpkin that’s sold in ascetic cartons at Whole Foods. And, it is easier because the pumpkin isn’t water logged!
I never the cracks in pie were an indication of over cooking. Thanks
Thanks chef! Ahhhh interesting. Will have to check that out sometime (:
Haha no worries. Thanks for your comment (:
Such a beautiful pie Nick!! When we lived in Spain I would baked up pumpkin from scratch to make pie, but now back in California, I’ve gotten lazy because I can just buy it in the can! Im sure yours it the best! For Halloween we have friends coming over to sit around the campfire in the front yard and well snack and pass out candy to the kids who come trick or treating. A fun night! Happy Halloween there Nick!
Thanks so much Rhonda. Super jealous that you got to live in Spain! That sounds like one super awesome Halloween!! (:
The only time I made one from scratch it was a flop, so I’ll have to reconsider. Yours look great though! I’m sure they taste even better!!
Haha, yer it took me quite a while to figure out the measurements. Thanks so much for your comment (:
This is so beautiful looking and tempting dish..
Thank you so much (:
Nice pie. I find fresh cooked pumpkin a bit watery. The canned is denser and more intense in flavor to my taste buds.
Hmm that is interesting. In this recipe, I made sure I dried out the pie as much as I could after boiling it. But perhaps sometime I will try it with the canned stuff. Thanks fot your comment! (:
This is one beautiful pie. And perfect crust. In the US we use a heavier hand on the spices, but obviously that a personal choice, and not a rule! I love what you did with the strawberry cousins!
Well done. I was particularly impressed by your tart case. I just use plain old pie plates to make my pie crsts. This year I made my first ever pumpkin pie using a Food Wishes recipe. It turned out nicely but pumpkin will never be my favourite flavour.
I would have liked to ‘like’ your post as well but the “LIKE” button never loads. I keep getting this no matter how often I try to reload the post.
Like this:
Loading…
The browned butter and fresh pumpkin in this pie sounds delicious! That’s a lot of dedication to make the pumpkin puree from scratch and I’m sure it pays off 🙂 Also, I’ve never heard of wetting the parchment paper when blind baking. What is that for?
Thank you so much! It totally is worth it. And I just find wetting it makes the paper more flexible, goes into the pastry case easier. And it can prevent the paper from burning in the oven. It’s an optional step though (:
Thank you so much and I bet you did a fab job of that pumpkin pie 😉 and thank you for letting me know about the like button issue (:
Thank you so much, and I will have to use more spices net time!
Ooh good to know! I will give it a try the next time I blind bake. Especially with the smaller tarts tins, I find them so finicky to line 🙂
For some unexplained reason, people started celebrating Halloween in Greece… No comment on that, but I am in for the pies!! 🙂 This dish is beautiful!! 🙂
This is an amazing pumpkin pie, a real work of art. Most of all I like the texture and decoration. Is it your idea or someone inspired you (I mean decoration)? You are so creative! It would never have crossed my mind to make something like this for Halloween :))) My maximum is cookies in the form of witch’s fingers or cupcakes made from candy leftovers. I really liked your idea, and though Halloween is over, I am sure to make this pumpkin pie next year. Thank you very much!
Hi! I am very sorry for my very long reply, I have taken a break from this blog but thank you so much for the lovely comment! So happy you enjoyed the pumpkin pie!!