So many people are into food photography lately. Or as many of us like to call it, food porn. I myself am a huge fan of food photography and I have developed a great passion for it since I started blogging. Now, before you read these tips and tricks, let’s do an exercise. I want you to use your imagination. Think of 2 dishes on a table in front of you. Imagine that one of those dishes is a very simple dish. Possibly something you could even classify as ‘boring” (something like a bowl of porridge or some fruit). I want you to imagine that the other dish is something that looks incredible (such as croquembouche, a triple layer cake or a Michelin star plate of food). Big difference right? But that story can change dramatically when you look at that food through a lens.
There are many guidelines to help make your food look appetizing. So I decided to list some simple tips that have worked really well for me. Whether you are using a DSLR, a point and shoot camera or an iPhone, this information will still be beneficial. So let’s get into it!!
Focus:
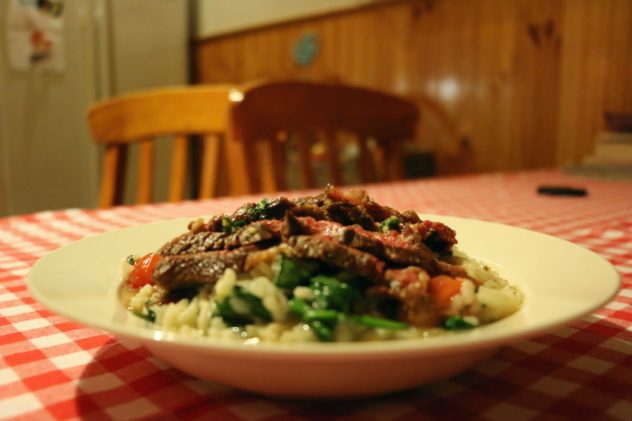
The first risotto picture is the first shot I ever took for the blog, so as you read through these tips, you will notice that there are many things wrong with this shot. But the only thing I want you to focus on in that picture is….well, the focus. When you look closely at the picture, you may notice that the back of the food on that plate is more focused than the front. This happened because I wasn’t paying attention to the simple details. Adjusting the focus a little more and concentrating on what I really wanted to focus on would have made for a much better photo.
 If you are using a DSLR, you may have heard a number of photographers talk about how manual focus is much better than auto focus. However, I am not opposed to using auto focus, in fact I use it a fair bit. If auto focus actually focuses where I want it to, then that is fine with me. However, manual focus has the advantage of allowing you to choose where you focus before you settle and shoot. So make sure that you focus right on the desired area. This is your top priority before snapping that picture.
Lighting:
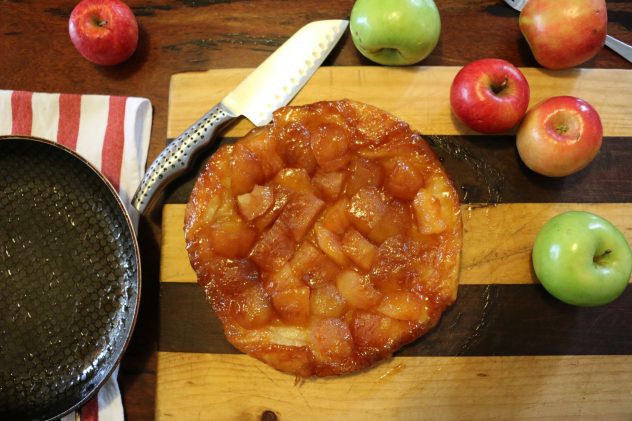
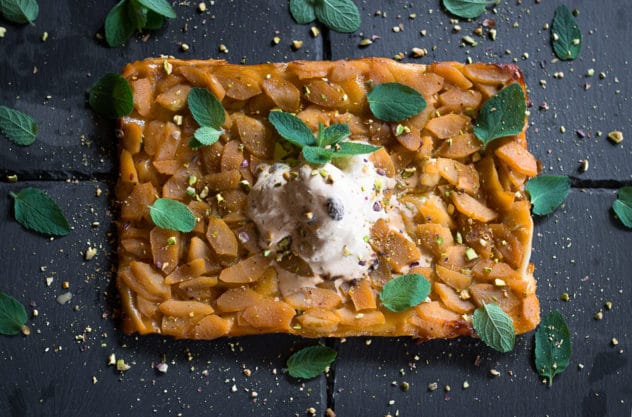
This is one of the first principles any photographer will go over. I hope these pictures show the importance of just how much lighting affects your image. I prefer to use natural lighting wherever possible. However, that doesn’t mean that natural lighting is an absolute must every single time. I have seen many great food photos where the photographer has used soft boxes or camera flashes. These are the only kinds of artificial lighting I would personally use for food photography, but as you can see from the first Tart Tatin picture, that yellow lighting tends to make your food look less appealing. So my advice; try shooting in a room where you can turn all the lights off with only the natural light coming through the windows nicely. Whether that be the kitchen, lounge room, laundry etc. Any room can be useful.
Close ups:
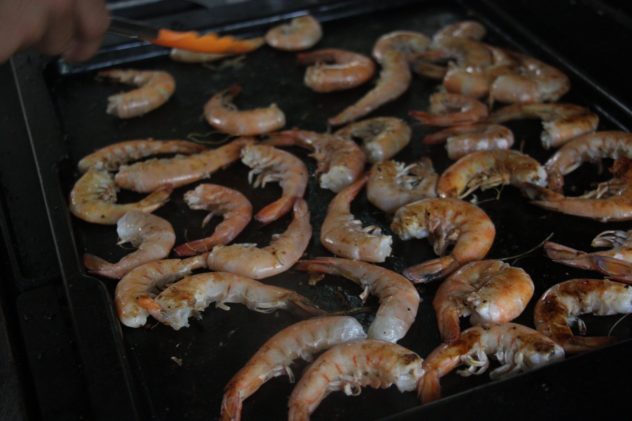
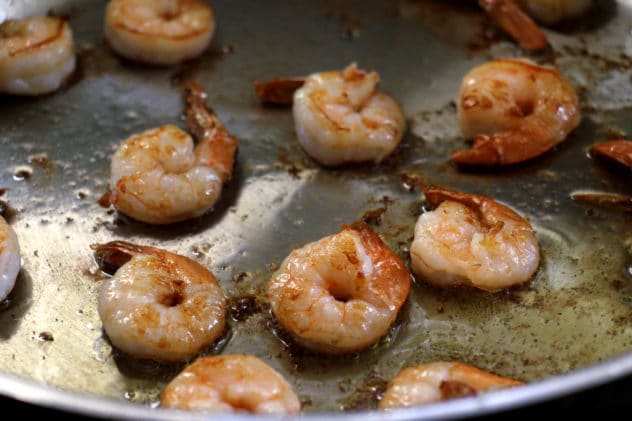
Notice, in the first picture of the frying prawns, everything happening around the food is a distraction. In other words, it is not always necessary to show everything in the image. This is important to keep in mind when taking a food photo. What do you actually want the viewer to see? Ask yourself, ‘Do I need that in the image?’ If you find yourself in a situation where nothing seems to be working, try zooming in to get some close up action. Really focus on those small details. For example, in the second picture of the prawns you notice the texture, the colour and the bubbles popping off as the prawns are frying.
 Doing a close up shot worked out so much better for me in the second shot and it may have worked out better in the first picture as there wasn’t really anything else that needed showing. Perhaps you could take a close up of the icing dripping down that cake, or breaking that muffin open to get a close up of the inside of what you have just cooked.
Props:
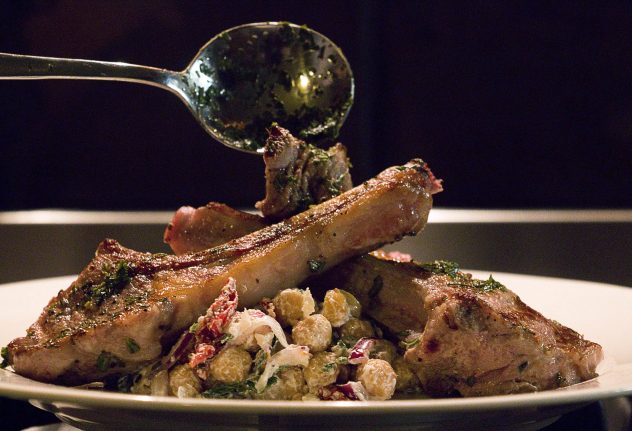
When you look at the first picture with the lamb cutlets, can you see how that light is bouncing off the spoon? Once you actually view the full size image it is very distracting and draws focus away from the food. These days I usually avoid white plates and silver kitchen ware.
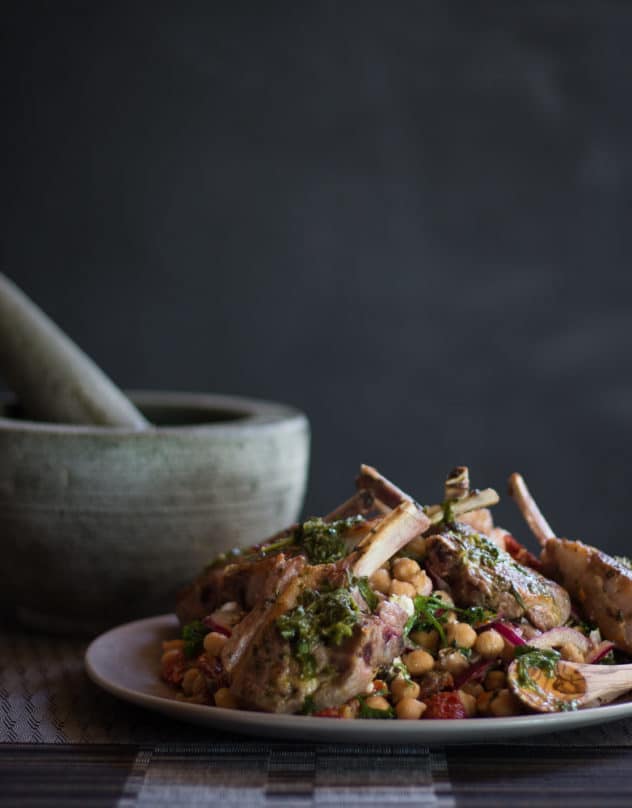
I prefer to look for the worn or wooden cutlery, and the darker, more subtle kitchen props that don’t glare back at you in the light. I feel that this allows the food to shine and show its magic and everything else in the image is a great visual supporter of that food. As you can see in the second picture, I used a dark plate and a wooden spoon. The pestle and mortar is nice and subtle in the background but still has a definite presence.
Food Styling:
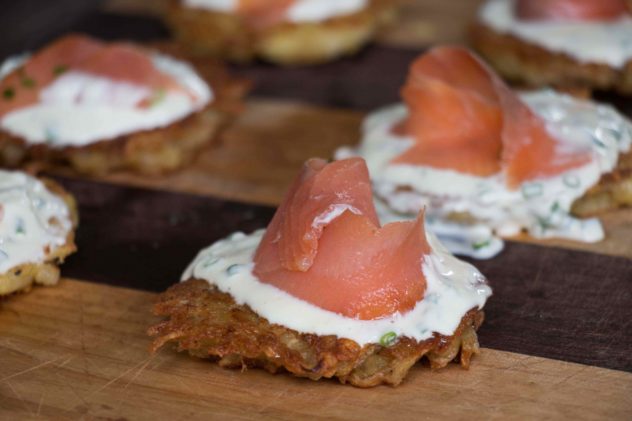
I actually think that first shot of the potato cakes is quite nice. However, I felt the set up of the shot was a little boring. Notice that the color of the board is a very similar color of the potato cakes. Yes, the sour cream and the smoked salmon on top helps with this, but the stripes are very distracting as well.
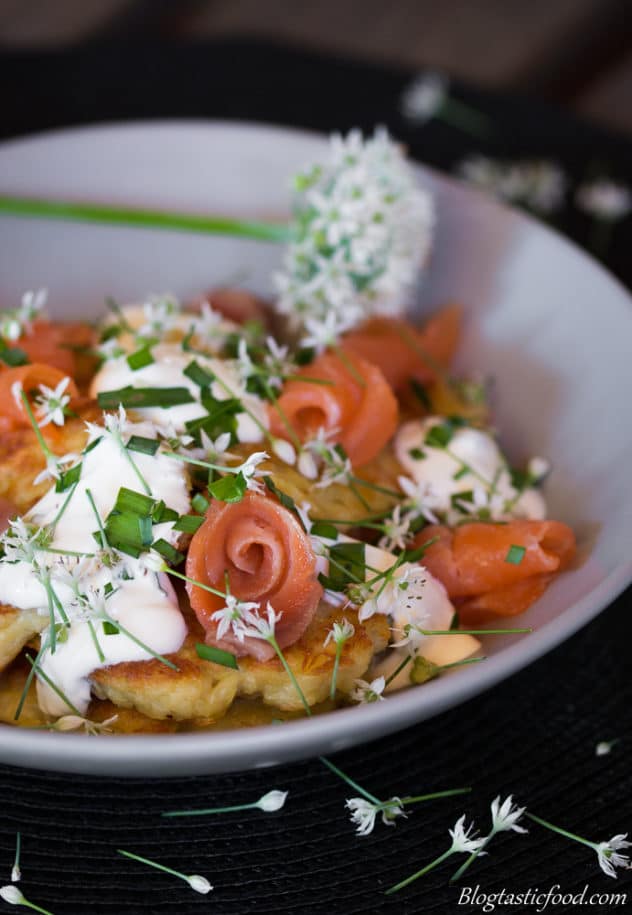
I suggest putting the food on a contrasting surface colour. Add some garnish such as chopped herbs, stack the potato cakes on top of each other (although that trick is losing it’s originality as it is done so many times). Experiment, and see how you can dress things up without going overboard. In the second picture I put the potato cakes in a bowl, I garnished them with chopped chives and I added the chive flowers which happened to be in flower at that time. Take advantage of seasonal flowers and keep an eye out for something different to style your food in the best and most creative way you can.
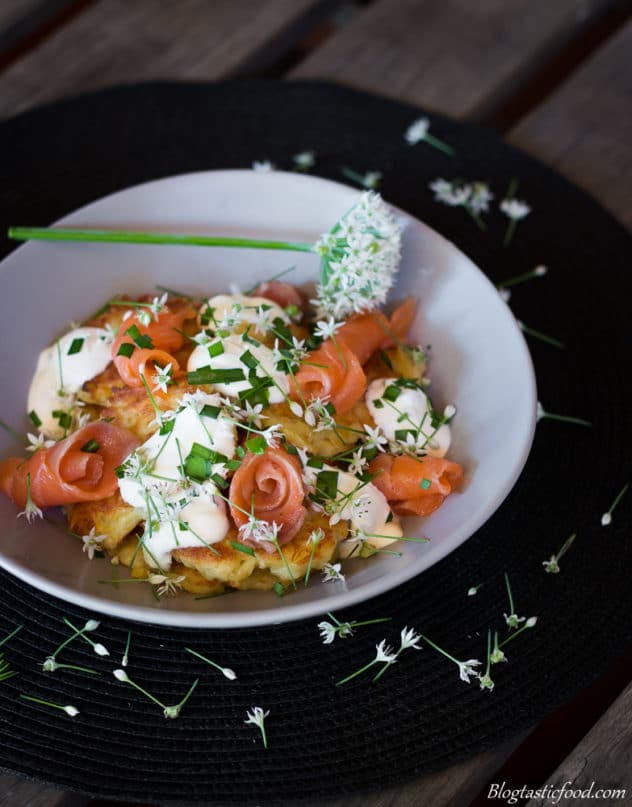
I suggest putting the food on a contrasting surface colour. Add some garnish such as chopped herbs, stack the potato cakes on top of each other (although that trick is losing it’s originality as it is done so many times). Experiment, and see how you can dress things up without going overboard. In the second picture I put the potato cakes in a bowl, I garnished them with chopped chives and I added the chive flowers which happened to be in flower at that time. Take advantage of seasonal flowers and keep an eye out for something different to style your food in the best and most creative way you can.
Finesse:

I feel this is part of food styling and I listed it as a separate tip because I think it is really important. I do like the first picture, but the problem for me is that it is good, BUT it could be great. When you look at the image closely, notice how I haven’t wiped away some of the oil on that plate. Also, my background is messy and unprepared.
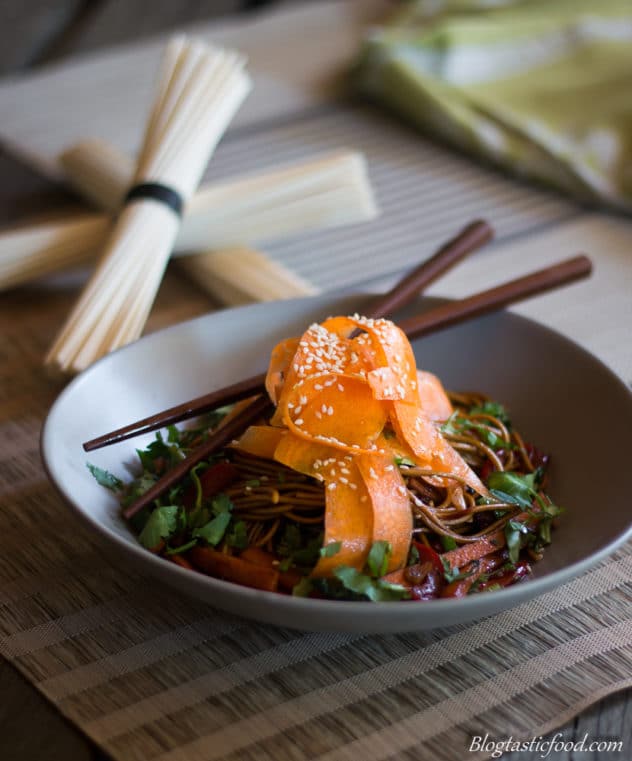
Yes that’s right, I always get critical with my photos. If you are reading this because you just like to take cool photos for a sexy Instagram feed, that’s fine. However, if you are someone who is serious about food photography, then don’t be easily satisfied. Keep working at the image until you get it just how you want it. Like I said before, it is this kind of effort that will take your photos from good to great to amazing! In the second picture, the photo was set up after alot of thought and planning. The bowl was perfectly clean and I added some shaved carrots and sesame seeds on top to give the dish some height.
Composition:
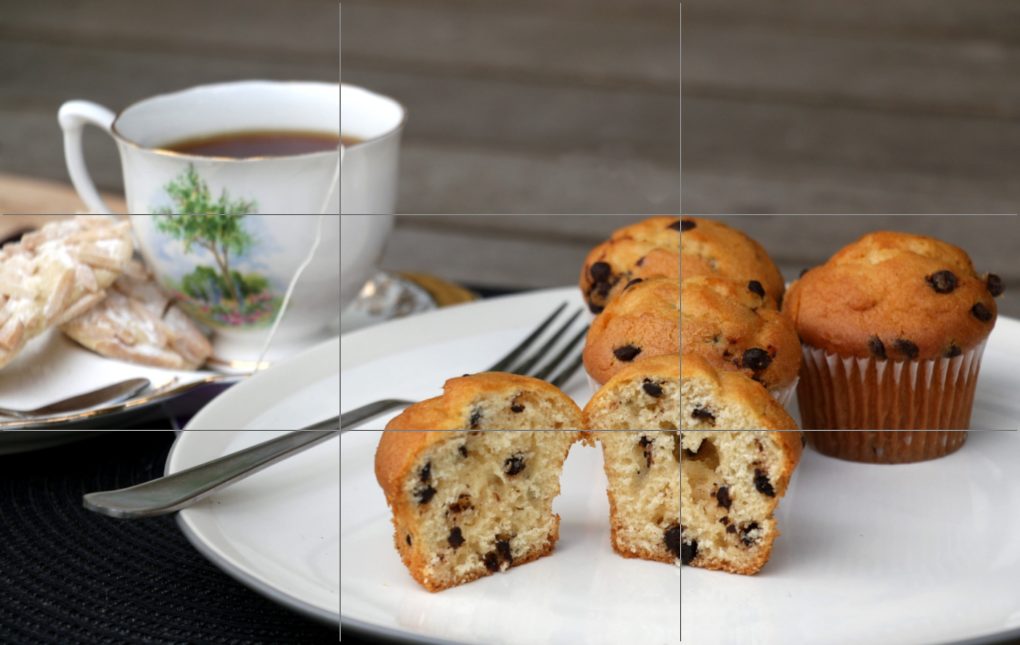
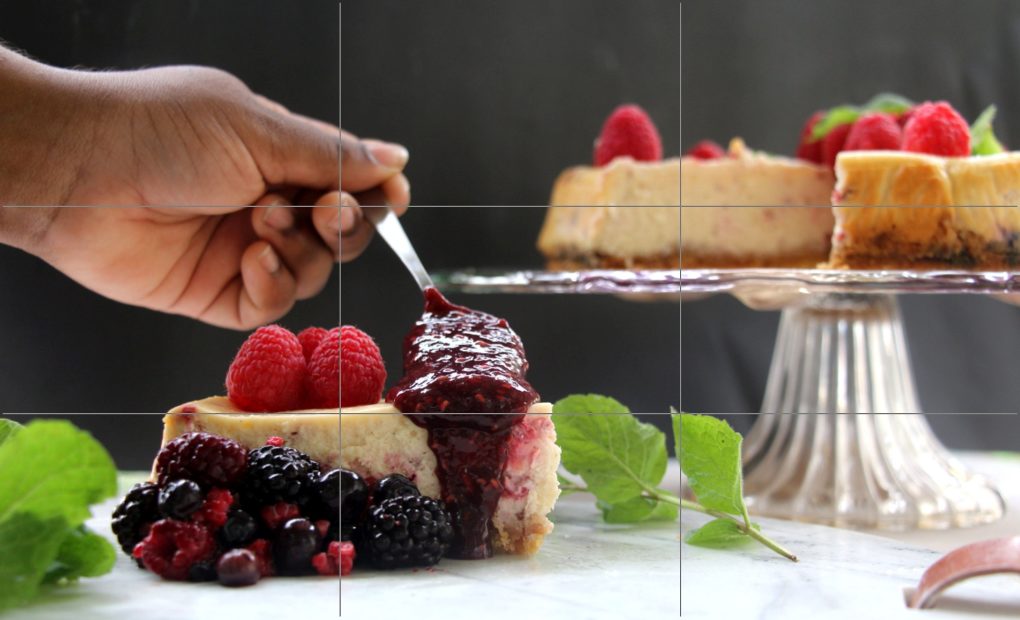 Ok, let’s talk about the rule of thirds. The rule of thirds is quite a simple concept. As you can see, I have broken these images down into thirds, and then created 9 squares on the image. The idea is to place the main subject of the image in the areas where the lines intersect. Apparently our eyes view the subject of an image much more naturally in those areas.

Having said that, I’ve seen many images that go completely against the rule of thirds that are incredible. Which is why I use the rule of thirds as a guideline, rather than a rule. Just like I do with most other tips in photography. Nevertheless, the rule of thirds is a fantastic tool to use when positioning food for photography, so keep it in mind for future reference.
Breaking the “rules”:
Food photography is always changing and developing, with new trends all the time. The best way to improve is by opening up your mind and trying new things. Don’t be afraid to experiment so that you can develop some individuality in your photos.
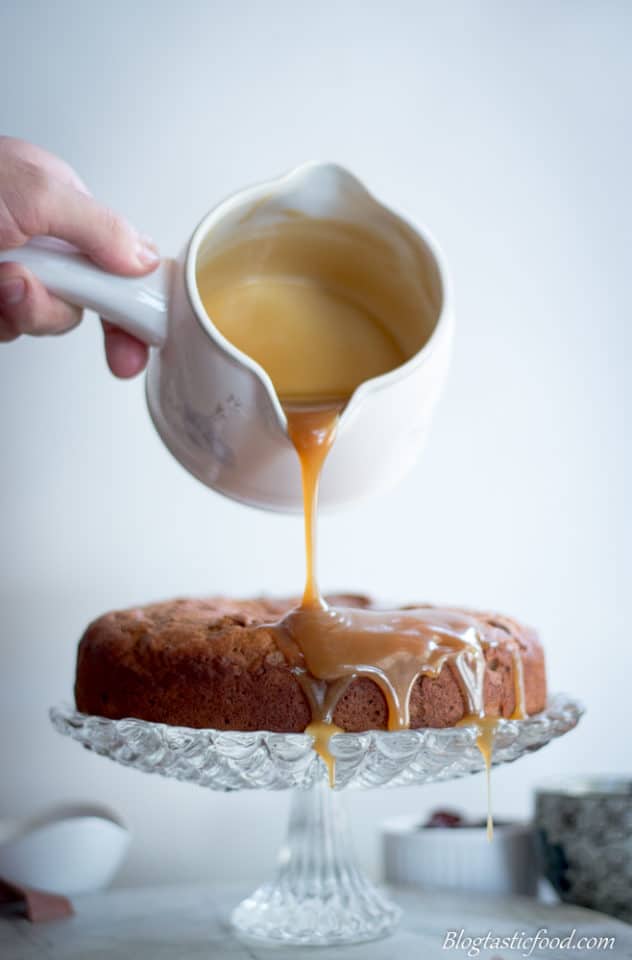
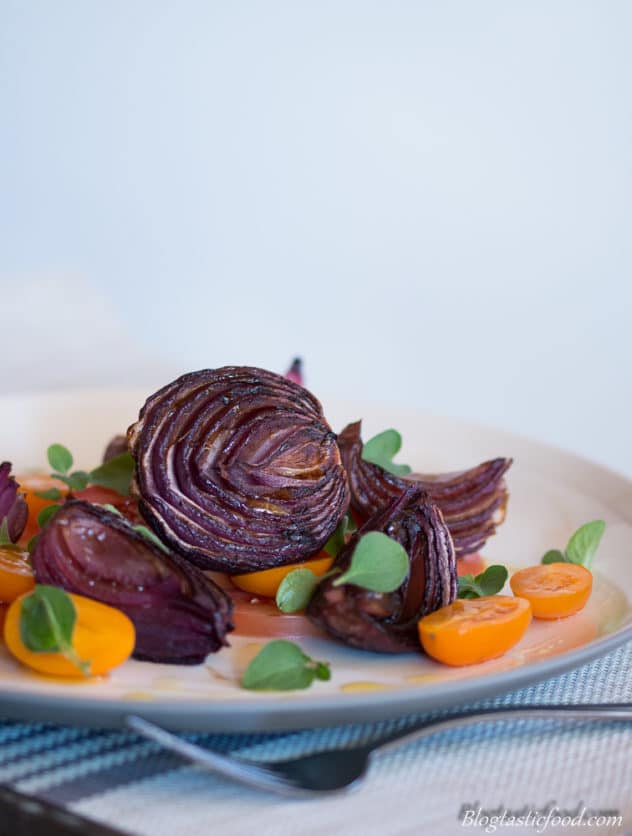 In the first picture of the butterscotch sauce going over the caramel, I went against the rule of thirds and my photo turned out great. In second photo of the roasted red onion, I used a silver fork and bright props which goes against the props tip I went over before. However, I was really happy with my photo. You may find yourself taking an outstanding food picture that goes against many tips you have learnt. But I believe if you are serious about food photography, these tips and tricks can help you improve the look of your photos.
Food Photography conclusion:
So there you have it, these are some of the tips that have helped me out with food photography. A lot of those “bad example” pictures I took were my older pictures from earlier posts in my blog. Better ones were just taken more recently.
So would I get rid of those older photos and replace them with the new ones? Absolutely not! You see folks, I believe learning about food photography is a journey . Exponential growth takes time and effort. I actually really like those older photos, Why? Well, because it still reminds me of the fun I had making those posts. It also shows just how much I have improved in just under 2 years. Don’t worry if your photos aren’t professional right away, as long as they consistently improve over. NOW! Go get your camera and start practicing! (:
Feel free to check out my Instagram page blogtastic.food.photography
If you’re interested in checking out my food photography mastery course, click the photo below.
This is amazing and so helpful for me! I have always struggled to take quality food pictures, but they really to make or break the articles! Thanks for breaking it down.
No worries! happy to help (:
Great tips and beautiful images, thanks for sharing!
Thanks! Glad you like it (:
Thank you for the post :):)
My pleasure Ele! (:
love all these tips here, bookmarking!
Thanks so much! Glad they could help (:
I found this post and your dark photography post to be so informative! Thank you so much for sharing, I am just starting to get into food photography and these tips really help.
So glad it was able to help you. Thank you so much for the comment, have a wonderful day (:
Best post I’ve read in a while.
Wow that is so great to hear. Thank you so much (:
Very beneficial. Thanks alot. Looking forward to learning more about food photography. 🌸
Hi! Thank you for the lovely comment! And I am glad this article helped you! (:
So helpful! Thank you so much. I hope one day I will be abel to create the same level of beautiful pictures as you!
Hey! Thank you so much for the lovely comment and if you ever want to ask me anything about food photography feel free to do so (:
Your pictures are BEAUTIFUL, and was so happy to read your approval of auto focus at times. I’m just becoming interested in food photography and the first “how to” I read was so against it that it said if you’re truly interested in food photography you CANNOT use auto focus. I’m just a lover of beautiful photography and love when I read that rules aren’t set in stone. Your food photography proves that! Thank uou for the fabulous tips. I can’t wait to put them to use!
Hey Robin! I am so sorry that this is such a late reply but I appreciate your comment. If you would like, I am more than happy to take you through how I like to focus on my main subject. (:
Awesome info and tips! Was very happy to discover this post.
I am going to shoot a variety of vegan cheeses that my wife has been producing.
And with this in mind, it can only be awesome, thank you!
Wow thanks Robert! If you have any other questions just email me [email protected]